Auto-Record is a time-saving feature that automatically starts recording when you begin streaming in a room. Instead of manually initiating recording each time, you can configure a room to capture every stream automatically, ensuring you never miss recording important content.
What You’ll Learn
By the end of this guide, you’ll know how to:
- Enable Auto-Record for a specific room
- Understand how Auto-Record interacts with the stream start process
- Manage Auto-Record settings through both the Room Controls and Admin Panel
Prerequisites
Before enabling Auto-Record, ensure you have:
- Edit Rooms permission in WisePub
- Access to the room you want to configure
- A stream source configured for the room (required for recording to work)
Understanding Auto-Record
When Auto-Record is enabled on a room, the system automatically triggers recording the moment streaming begins. This happens at the server level, meaning:
- Recording starts immediately when the stream goes live
- No manual intervention is required
- The recording captures from the very start of your stream
- If you forget to press record, the system handles it for you
Pro Tip: Auto-Record is ideal for rooms used for regular scheduled broadcasts, training sessions, or any content you always want to archive. Enable it once and never worry about forgetting to record again.
Step 1: Navigate to Your Room
Open the room where you want to enable Auto-Record. You can access rooms from:
- The main Rooms navigation menu
- A direct link to the room
Step 2: Open the Room Settings Panel
Click the Settings button (gear icon) in the room controls area to open the Room Settings slide-over panel.
Expected Result: A settings panel slides in from the right side of the screen with multiple tabs including Settings, Recordings, and CTAs.
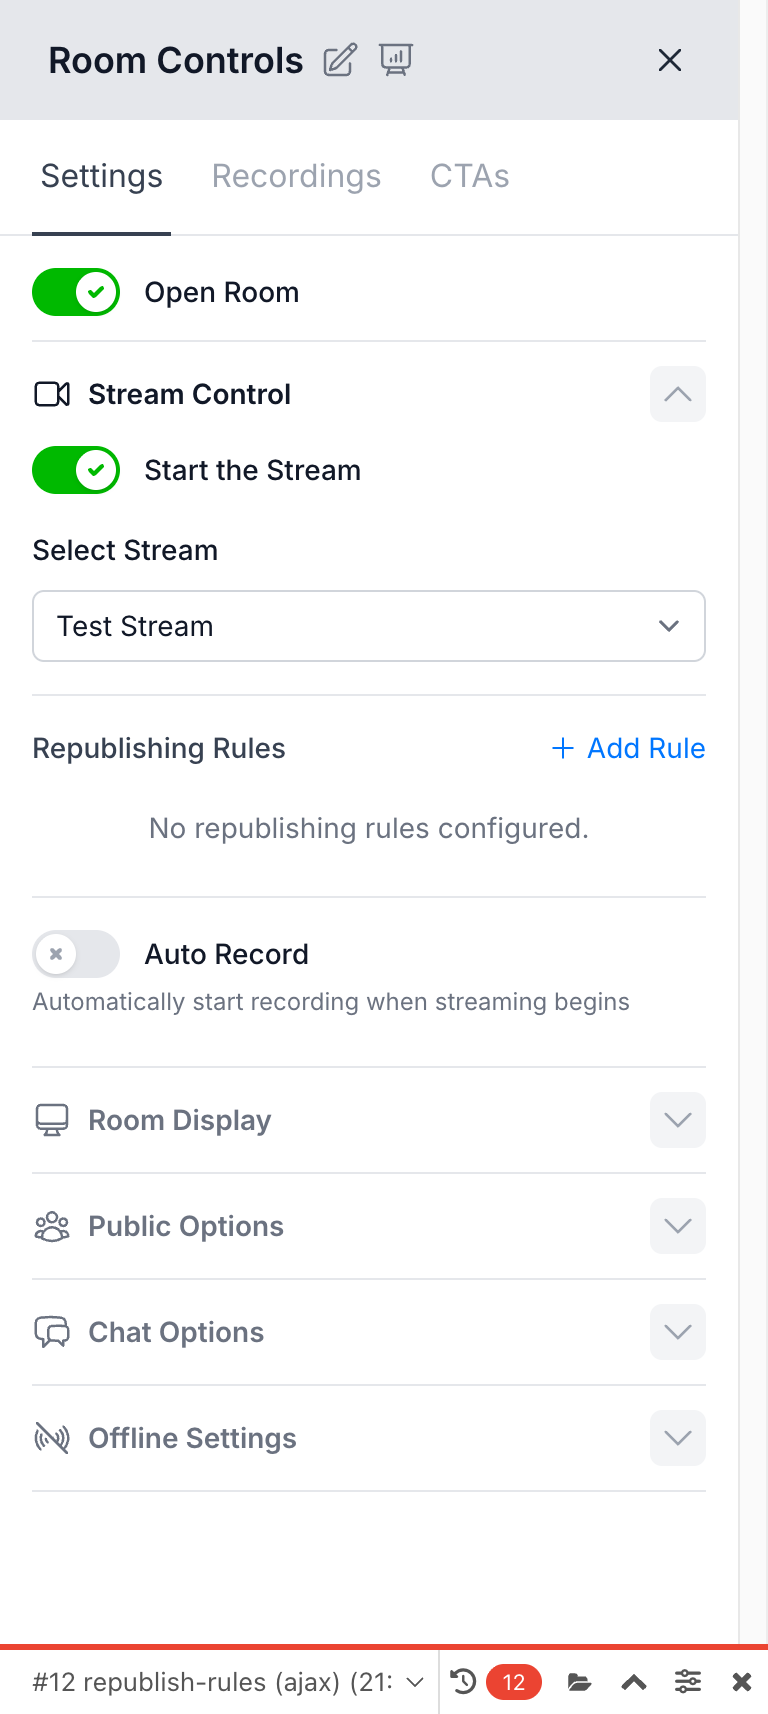
Step 3: Locate the Stream Control Section
In the Settings tab, find the Stream Control section. This expandable section contains all streaming-related settings including:
- Start the Stream toggle
- Stream source selection
- RTMP Republish rules
- Auto Record toggle
Step 4: Enable Auto-Record
Toggle the Auto Record switch to the ON position (it will turn colored when enabled).
Below the toggle, you’ll see the helper text: “Automatically start recording when streaming begins”

Expected Result: The setting saves automatically. No additional confirmation is required.
Step 5: Verify Auto-Record When Starting a Stream
When you start a stream with Auto-Record enabled, the system provides visual confirmation of the automatic recording behavior.
Click the Start the Stream toggle. A modal window appears with options for:
- Creating a new session (for tracking attendees)
- Starting recording
With Auto-Record enabled:
- The “Start Recording” toggle is automatically checked
- The toggle is disabled (grayed out) since recording will happen automatically
- A message appears: “This room is set to auto-record when starting a stream”
Step 6: Start Your Stream
Click the Start Stream button to begin broadcasting.
Expected Result:
- Your stream goes live
- Recording starts automatically in the background
- The recording indicator appears in your room controls
Pro Tip: Even though the recording toggle in the Start Stream modal is disabled when Auto-Record is on, the recording will still begin. The server handles the recording start automatically when the stream status changes.
Alternative Method: Configure via Admin Panel
Administrators can also enable Auto-Record through the Nova admin panel for bulk configuration or when setting up new rooms.
Step 1: Access Admin
Navigate to your WisePub admin panel (typically at /admin).
Step 2: Find the Room
Go to Rooms in the Nova sidebar and select the room you want to configure.
Step 3: Edit Room Settings
Click Edit to modify the room settings.
Step 4: Enable Auto Record
In the Room State panel, locate the Auto Record checkbox and enable it.
Step 5: Save Changes
Click Update Room to save your changes.
How Auto-Record Works Behind the Scenes
Understanding the technical flow helps you know what to expect:
- You toggle “Start the Stream” in Room Controls
- The stream status updates to “streaming: true”
- The system detects this change and checks if Auto-Record is enabled
- If enabled, recording starts automatically without any additional input
- A log entry confirms the automatic recording: “Recording started automatically for room: [Room Name]”
Important: If recording fails to start automatically (due to stream configuration issues), the system logs an error but your stream continues uninterrupted.
Tips & Best Practices
- Test before important events: Enable Auto-Record on a test stream first to confirm your recording setup works correctly.
- Check your stream source: Auto-Record requires a properly configured stream. Ensure your Stream is selected in the room settings before relying on automatic recording.
- Review storage: Automatic recordings consume storage space. Regularly review and archive or delete old recordings to manage your storage allocation.
- Session tracking compatibility: Auto-Record works seamlessly with Sessions. Enable both features to automatically record and track attendee engagement for your webinars.
- Manual override available: Even with Auto-Record enabled, you can still stop recording manually during a stream if needed using the Recordings tab.
Related Features
- How to Use WisePub Sessions and Track Webinars
- Managing Room Recordings
- Configuring Stream Sources
Summary
Auto-Record eliminates the risk of forgetting to record your streams by automating the process entirely. Once enabled on a room:
- Recording starts automatically when you begin streaming
- The Start Stream modal shows the auto-record status
- No manual intervention is required
- Every stream in that room gets recorded by default
Enable Auto-Record on rooms where you consistently want to capture content, and focus on delivering great broadcasts instead of remembering to click record.