Navigation menus help your members find their way around your WisePub site. With the Menu Management feature, you can create custom menus for different areas of your site, organize menu items with drag-and-drop, and control who can see specific items based on their subscription level.
Prerequisites
Before you begin, ensure you have:
- Administrator access to your WisePub account
- A clear idea of what content you want to include in your menu
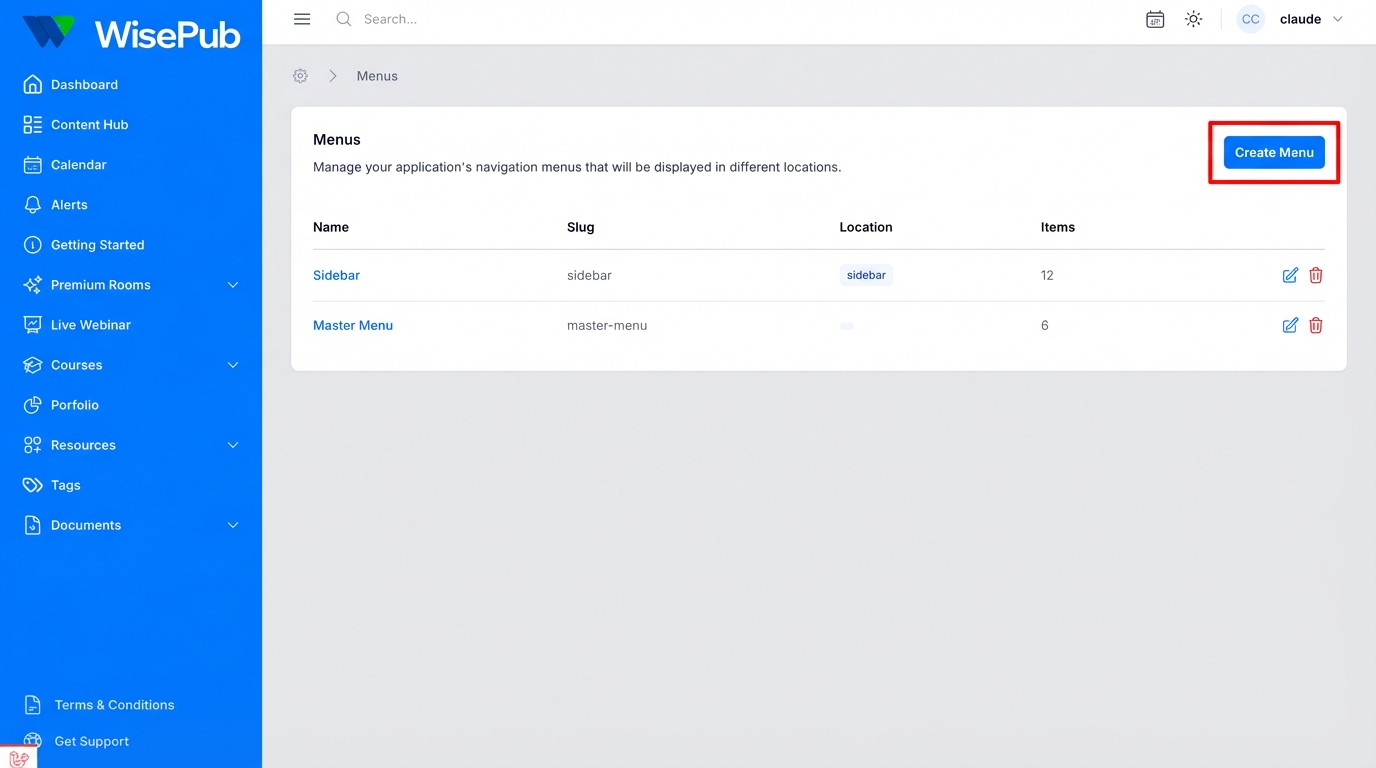
Accessing Menu Management
- Log in to your WisePub account with administrator privileges
- Navigate to Settings > Menus
Objective: Access the Menu Management area where you can view, create, and edit all your navigation menus.
Expected Result: You’ll see a list of all existing menus with their name, slug, location, and number of items.
Creating a New Menu
- From the Menus page, click the Create Menu button in the top right corner
- Fill in the menu details:
- Name: Enter a descriptive name for your menu (e.g., “Main Navigation”, “Footer Links”)
- Slug: This is auto-generated from the name but can be customized. Use only lowercase letters, numbers, and hyphens
- Location: Select where this menu will appear in your site
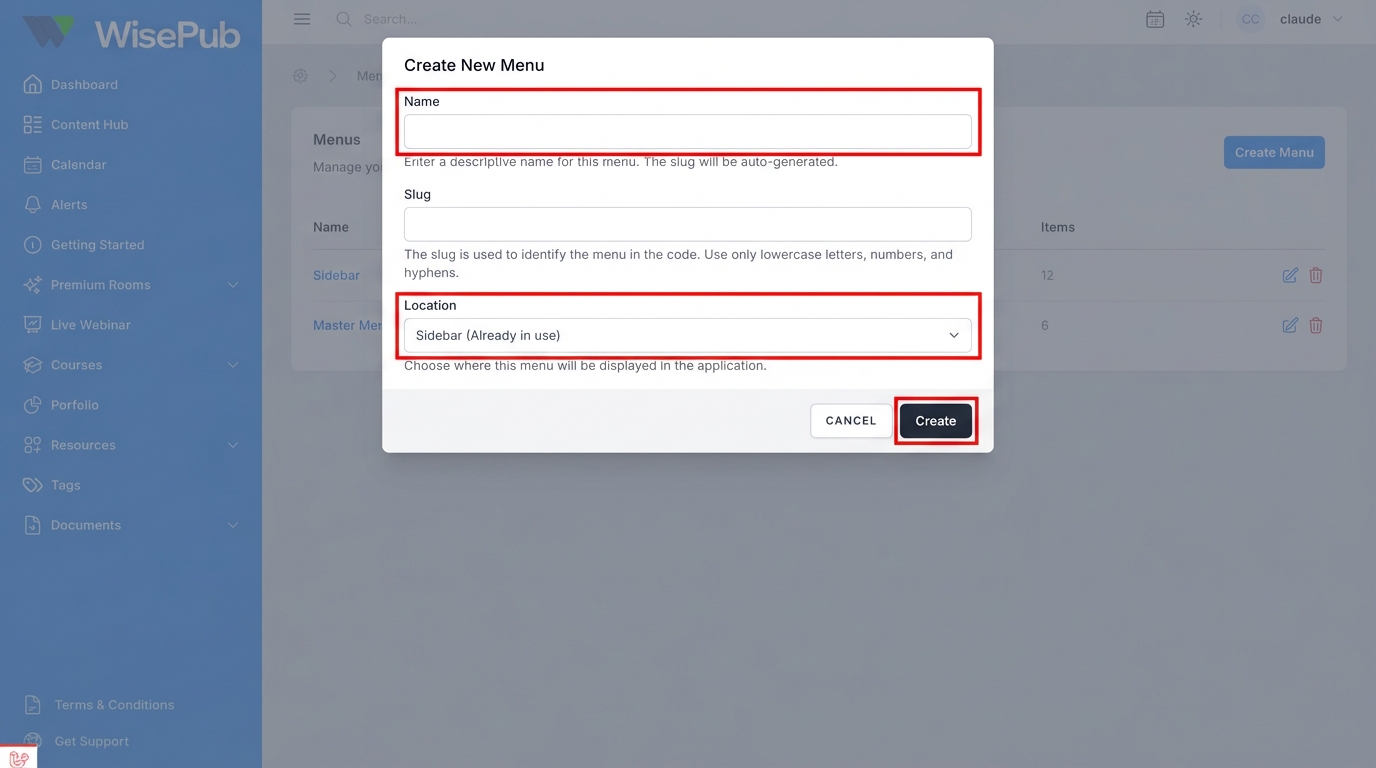
- Click Create to save your new menu
Objective: Create a new navigation menu that will be displayed in a specific location on your site.
Expected Result: Your new menu is created and you’re redirected to the menu editor where you can add items.
Available Menu Locations
WisePub supports multiple menu locations:
- Sidebar: The main navigation menu displayed in the left sidebar
- Header: Top navigation area
- Footer: Bottom of the page
- Mobile: Mobile-specific navigation
- Dashboard: Dashboard-specific navigation
Note: Each location can only have one menu assigned to it. If a location is already in use, it will be marked as “(Already in use)” and cannot be selected.
Editing a Menu
- From the Menus list, click on the menu name or the edit icon
- You’ll see two sections:
- Menu Details: Update the name, slug, or location
- Menu Structure: Manage your menu items
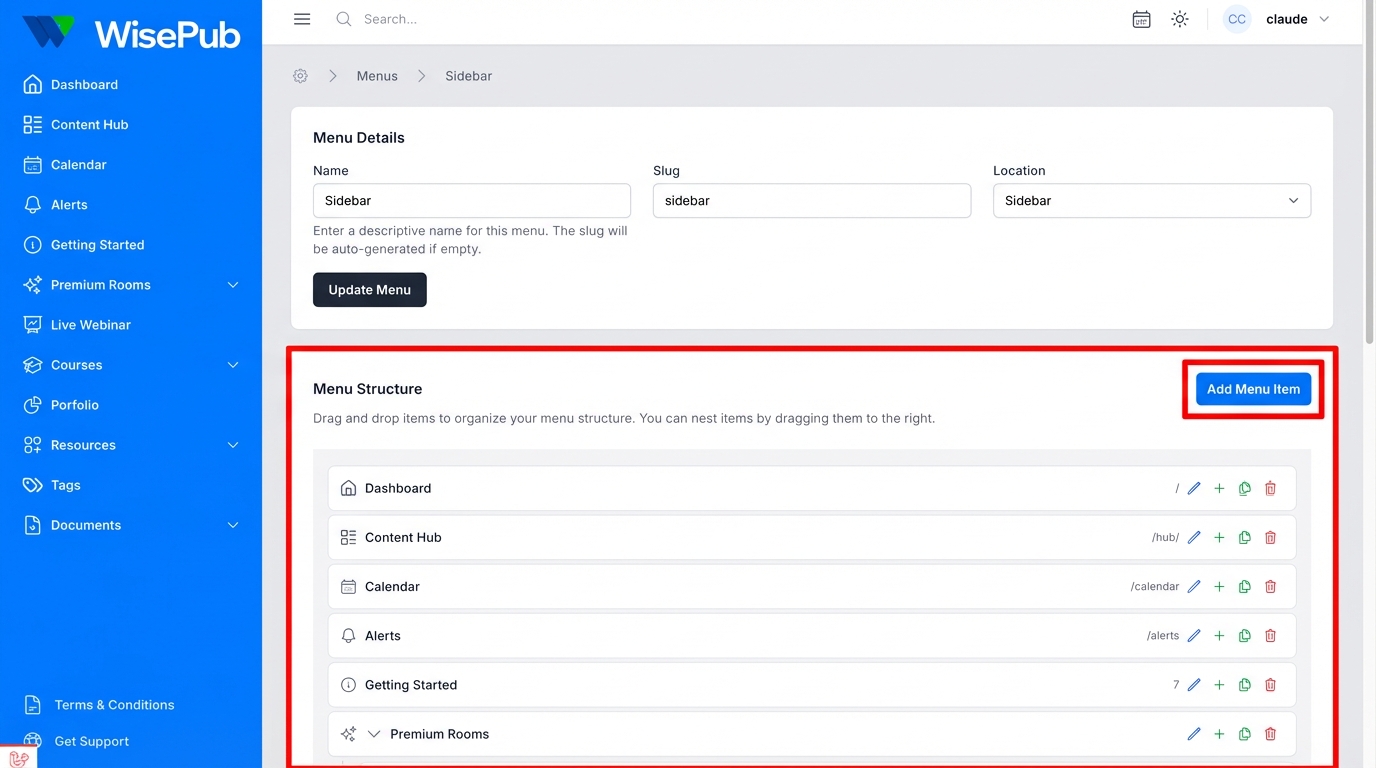
Updating Menu Details
- Modify the Name, Slug, or Location as needed
- Click Update Menu to save your changes
Pro Tip: Changing the location of a menu will immediately update where it appears on your site. Make sure you have content ready before moving a menu to a visible location.
Adding Menu Items
- In the Menu Structure section, click Add Menu Item
- Configure the item using the available fields (see below)
- Click Create to add the item to your menu
Item Type Options
| Type | Description |
|---|---|
| Static URL | Link to any URL (internal or external) |
| Text | Display text without a link (useful for section headers) |
| Course | Link to a specific course |
| Course Category | Link to a course category page |
| Room | Link to a chat room |
| Post | Link to a specific blog post |
| Post Category | Link to a post category page |
| Page | Link to a static page |
| Document | Link to a specific document |
| Document Library | Link to a document library |
| Portfolio | Link to a portfolio |
Configuring Item Settings
- Type: Select the type of content you’re linking to
- Value: Enter the URL (for Static URL) or select the specific content item
- Name: The text that will be displayed in the menu
- Icon: Choose an icon from the library or add a custom SVG
- Description: Optional descriptive text (shown in some menu styles)
- Subscriptions: Restrict visibility to members with specific subscriptions
- Open in new tab: Check this to open the link in a new browser tab
- Hide if no access: Hide this item from users who don’t have access
- Enabled: Toggle the item on or off without deleting it
- Can have children: Allow this item to contain nested sub-items
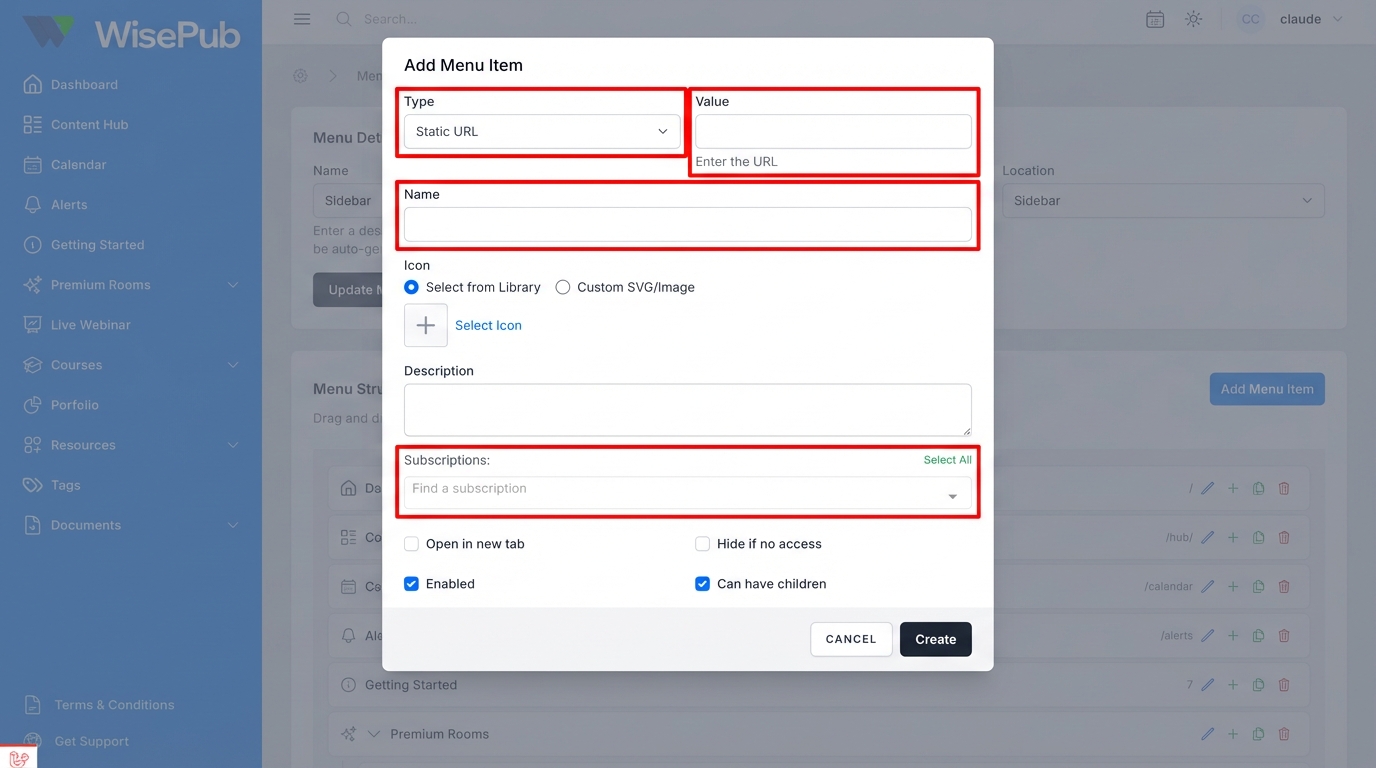
Objective: Add a new navigation link to your menu.
Expected Result: The new item appears in your menu structure and is immediately visible to users (if enabled).
Selecting an Icon
When adding or editing a menu item, you can choose an icon to display next to the item name:
- Click Select Icon in the Icon field
- Browse or search through the available icons
- Click on an icon to select it
- Click Select to confirm your choice
Pro Tip: You can also paste custom SVG code if you need an icon that’s not in the library. Select “Custom SVG/Image” and paste your SVG code in the text area.
Organizing Menu Items
Drag and Drop
Rearrange your menu items by clicking and dragging them to a new position:
- Drag items up or down to change their order
- Drag items slightly to the right to nest them under another item (creating a dropdown)
- Items can be nested up to 3 levels deep
Menu Item Actions
Each menu item has action buttons on the right side:
- Edit (pencil icon): Modify the item’s settings
- Add Below (plus icon): Add a new item directly below this one
- Duplicate (copy icon): Create a copy of this item
- Delete (trash icon): Remove the item from the menu
Expanding and Collapsing
For items with children, click the arrow icon to expand or collapse the nested items. This helps you manage complex menu structures more easily.
Pro Tip: When reorganizing items with children, be aware that moving a parent item will also move all of its nested children.
Restricting Menu Item Access
You can control who sees specific menu items based on their subscription level:
- Edit the menu item
- In the Subscriptions field, select one or more subscriptions
- Optionally, check Hide if no access to completely hide the item from non-subscribers
When a menu item has subscription restrictions:
- A padlock icon appears next to the item in the menu editor
- Hovering over the padlock shows which subscriptions are required
- Users without the required subscription won’t see the item (if “Hide if no access” is enabled)
Pro Tip: Use “Hide if no access” to keep your navigation clean for users who can’t access certain content. Leave it unchecked if you want to show the item but redirect users to an upgrade page.
Deleting Menu Items and Menus
Deleting a Menu Item
- Click the trash icon on the item you want to remove
- Confirm the deletion in the popup
Warning: Deleting a parent item will also delete all of its nested children.
Deleting a Menu
- From the Menus list, click the trash icon next to the menu
- Confirm the deletion
Warning: Deleting a menu will remove all of its items. The location will become available for a new menu.
Tips & Best Practices
- Keep it simple: Limit top-level items to 7-10 for optimal usability
- Use descriptive names: Make sure menu item names clearly indicate what users will find
- Group related content: Use nested items to organize related pages together
- Test on mobile: Check how your menu looks on mobile devices
- Use icons consistently: Choose icons that visually represent each section
- Consider your audience: Place the most important items where users expect to find them
- Review subscriptions: Regularly audit subscription restrictions to ensure members see appropriate content
Summary
The Menu Management feature gives you complete control over your site’s navigation. You can:
- Create menus for different locations (sidebar, header, footer, mobile, dashboard)
- Add various types of content links (pages, courses, rooms, posts, and more)
- Organize items with drag-and-drop and nesting
- Restrict access based on subscription levels
- Customize icons and descriptions for each item
Related Features
- How to create a subscription – Create subscription levels that control menu item visibility
- Managing Courses in Wisepub – Build courses that can be added to your navigation
- How to use the document library – Create document libraries to link in your menus
- How to create a room for chat and/or streaming – Set up rooms that can be added to your navigation