
API tokens let you connect your own tools, scripts, and integrations to your WisePub site. Instead of sharing your login, you generate a personal token that authenticates requests on your behalf — and you decide exactly which actions that token is allowed to perform.
This guide walks you through creating a token, choosing its permissions, using it to call the API, and revoking it when you no longer need it.
Prerequisites
Before you begin, make sure you have:
- An account with backend access (the same access that lets you reach the admin area). If you don’t see the API Tokens tab described below, ask your administrator to grant you access.
- A basic understanding of how to make an HTTP request (for example with
curl, Postman, or your own code). No coding is required to create a token — only to use it.
Note: API tokens are a developer-focused feature. If the feature isn’t enabled on your site, the API Tokens page won’t appear. Contact your administrator to have it turned on.
Step 1: Open the API Tokens Page
- Click your user menu in the top-right corner and go to your account settings.
- In the settings navigation, click the API Tokens tab.

Expected Result: You land on the API Tokens page, where you can create new tokens and manage existing ones.
Step 2: Create a Token
Objective: Generate a new token with a clear name and only the permissions it needs.
- In the Name field, enter a descriptive name that reminds you what the token is for — for example,
Zapier integrationorNightly export script. - Under Permissions, check the boxes for the actions this token should be allowed to perform. Use Select all if the token genuinely needs every permission, but it’s safer to grant only what you need.
- Read and check the terms acknowledgement box confirming you’ll keep the token secret and treat it like a password.
- Click Create.
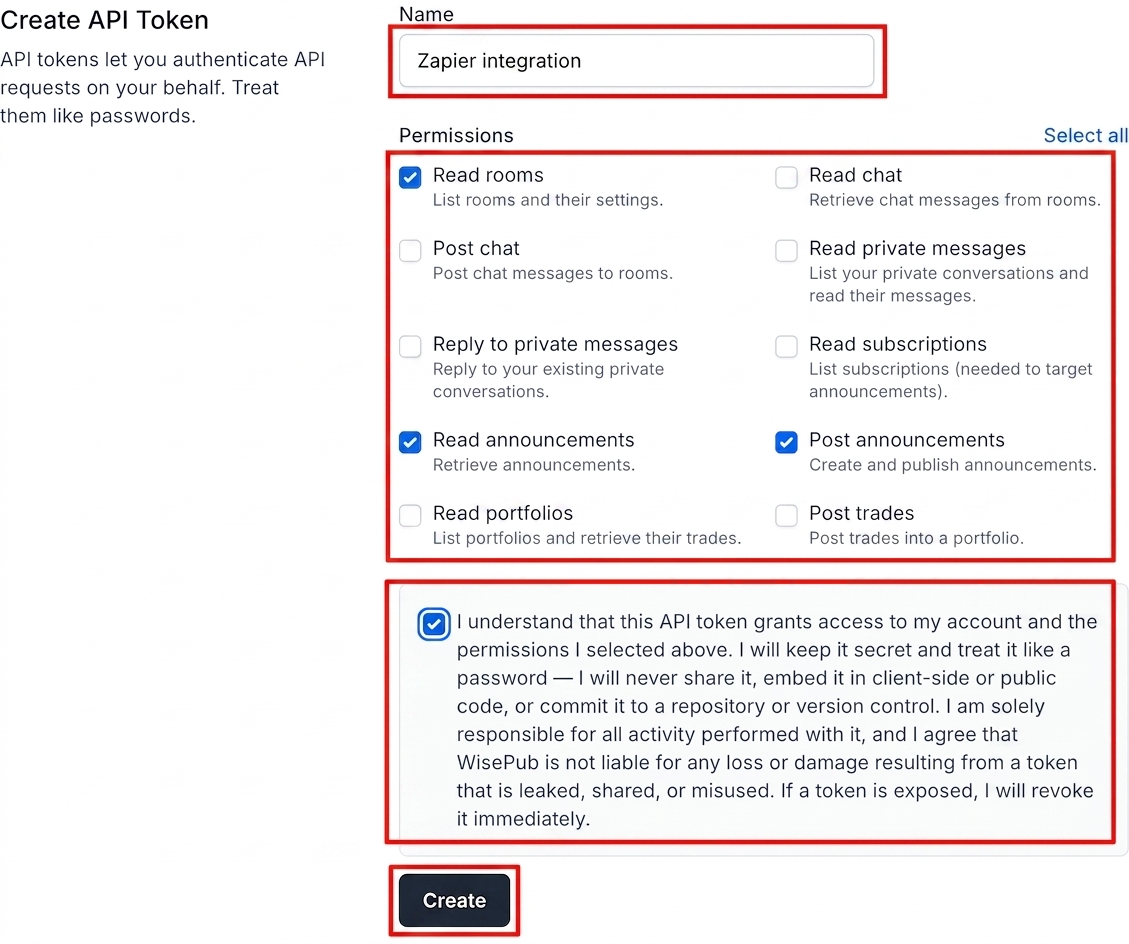
Expected Result: The token is created and its secret value is shown to you.
Pro Tip: Create a separate token for each integration. That way, if one needs to be revoked, your other integrations keep working.
Step 3: Copy Your Token — You’ll Only See It Once
As soon as the token is created, WisePub displays the full token value in a pop-up. This is the only time the full token will ever be shown.
- Click Copy to copy the token to your clipboard.
- Paste it somewhere safe and private (a password manager is ideal).
- Click Close.
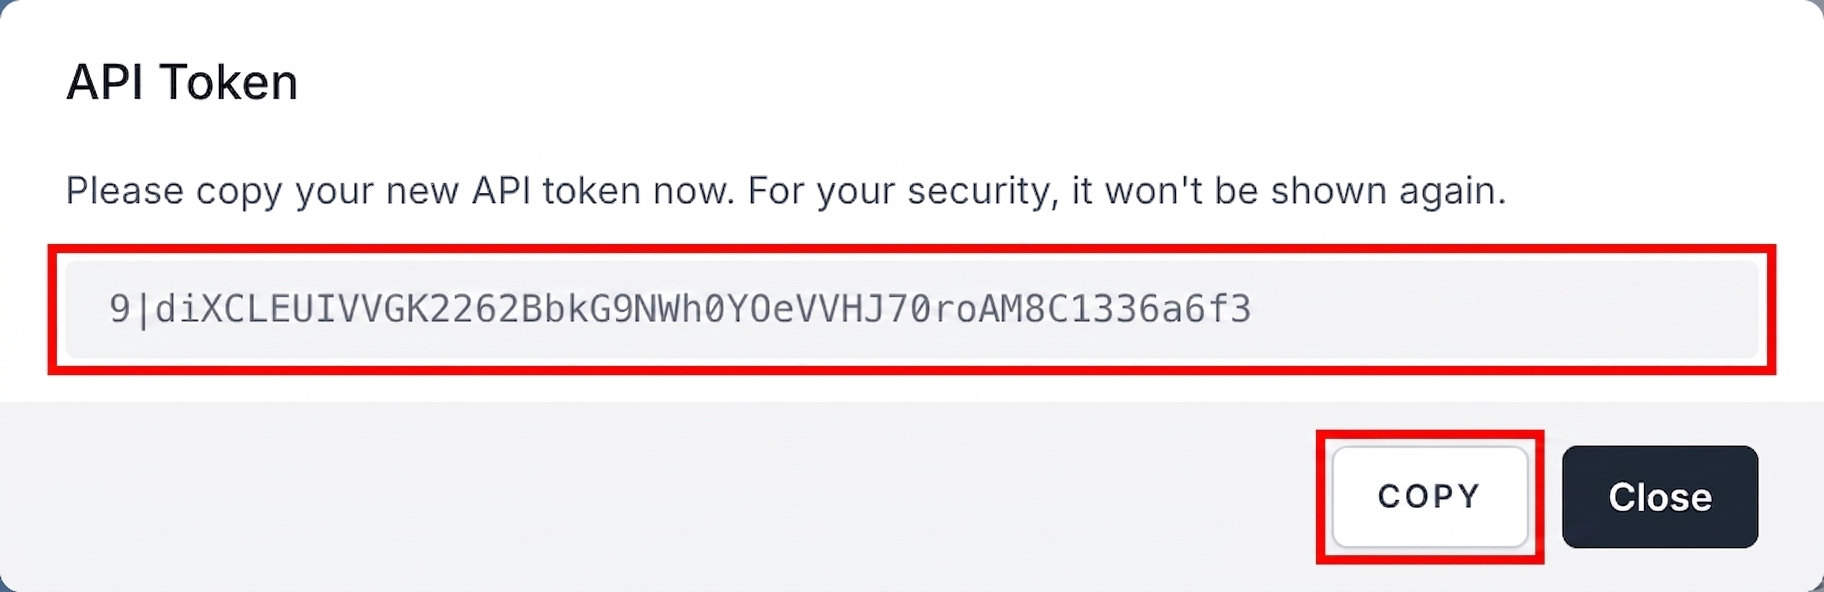
Expected Result: Your token is saved securely on your side. On the API Tokens page it now appears in the list, but only its name and permissions are shown — never the secret again.
Pro Tip: If you lose the token or think it may have been exposed, don’t worry about recovering it — simply revoke it and create a new one.
Step 4: Use Your Token to Call the API
Send your token in the Authorization header of each request as a Bearer token:
Authorization: Bearer YOUR_TOKEN_HEREFor example, to list your rooms:
curl https://YOUR-SITE.com/api/v1/rooms \
  -H "Authorization: Bearer YOUR_TOKEN_HERE" \
  -H "Accept: application/json"
Replace YOUR-SITE.com with your WisePub domain and YOUR_TOKEN_HERE with the token you copied.
Each endpoint requires the matching permission. If your token is missing the permission an endpoint needs, the request is rejected with a 403 Forbidden response. If the token is missing or invalid, you’ll get a 401 Unauthorized response.
Pro Tip: Always send an
Accept: application/jsonheader so the API returns clean JSON responses.
Available Permissions
Each permission unlocks a specific set of API actions. The permissions available to you depend on which features are enabled on your site.
| Permission | What it allows |
|---|---|
| Read rooms | List rooms and their settings. |
| Read chat | Retrieve chat messages from rooms. |
| Post chat | Post chat messages to rooms. |
| Read private messages | List your private conversations and read their messages. |
| Reply to private messages | Reply to your existing private conversations. |
| Read subscriptions | List subscriptions (useful for targeting announcements). |
| Read announcements | Retrieve announcements. |
| Post announcements | Create and publish announcements. |
| Read post categories | List post categories (useful for organizing posts). |
| Create posts | Create and publish posts. |
| Read portfolios | List portfolios and retrieve their trades. |
| Post trades | Post trades into a portfolio. |
Step 5: Revoke a Token
If a token is no longer needed — or you suspect it has been exposed — revoke it right away.
- On the API Tokens page, find the token in the Manage API Tokens list.
- Click Revoke next to it.
- Confirm by clicking Revoke in the pop-up.

Expected Result: The token stops working immediately. Anything using it — including scripts, integrations, or a connected mobile device — will lose access until you issue a new token.
Tips & Best Practices
- Name tokens clearly. A name like
Marketing Zapieris far easier to manage thantoken1. - Grant the least access needed. Only check the permissions an integration actually uses.
- One token per integration. This limits the impact if a single token has to be revoked.
- Never embed a token in public or client-side code. Keep it on your server or in a secure secrets store.
- Rotate tokens periodically. Create a fresh token and revoke the old one to reduce risk.
- Revoke immediately if exposed. A revoked token can’t be used, so replacing a leaked token takes only seconds.
Summary
API tokens give you a secure, permission-scoped way to connect external tools to your WisePub site without sharing your password. Create a token from the API Tokens page, grant it only the permissions it needs, copy the secret value once, and send it as a Bearer token in your API requests. When a token is no longer needed, revoke it — the change takes effect instantly.
Use WisePub with an AI Agent (Advanced)
If your AI assistant supports skills — a set of instructions it loads on demand — you can hand it everything it needs to operate your WisePub site through the API: reading and posting chat, publishing announcements and posts, and managing portfolio trades.
To set it up, create a file named SKILL.md, click Copy below, and paste the content into that file. Then add the file to your AI agent.
Before you use it, replace <your-wisepub-domain> and <host> in the skill with your own WisePub site address — for example, app.yoursite.com. You don’t need to put your API token in the file: generate one using the steps above, grant it only the scopes your agent needs, and provide it to your agent when it asks.
Related Features
- Post Announcement API – See how the announcement permissions let your integrations create and publish announcements.
- API Documentation for User Management – Learn more about WisePub’s API for managing your users.
- API adding members subscriptions – Add members and assign subscriptions through the API.